I had a wonderful Christmas season. Our children got us some amazing gifts that I admit make me a super proud moma. For starters, they know we enjoy having date nights at home so several of them got us gift bags to help us enjoy our home date nights! From movies to snacks, we are set for several home date nights. LOVE IT!
Another favorite gift we received was from T & N, who live in Portland. They surprised us with a Portland getaway to come see them! We cannot wait to redeem this gift and the opportunity to spend time together with them in their stomping grounds.
Through the years we have changed our gift giving from when we started our family and were overspending on needless gifts so our kids would just have more things to open to gifts that mean something. We have done several different challenges through the years and while we did name an official challenge this year, I am content with how our gift giving turned out. Here's a sampling:
Most of the kids got books, either to complete a series or starting a new one. One daughter got silverware since she is getting married this year; the other daughter got a new pair of boots that should help her out with her student teaching this semester. The little boys got fleece blankets in their favorite sport team's fabric and sport bags to store their stinky sports stuff in. HA!
I am also super excited that I got special quilt square rulers and a 2011 NIV Bible!
Anyway, I have posted through the years about gift giving and thought I should keep the tradition going.
Merry Christmas 2016!
#giftgiving #Christmas2016 #frugality #FPU
Showing posts with label frugality. Show all posts
Showing posts with label frugality. Show all posts
Monday, January 09, 2017


Saturday, November 02, 2013
Pumpkin Soup
Using the base recipe from Dr. Oz that I found on Pinterest, I then made the soup "my own".
 (Please, compliment me on my fabulous photography skills today. I know you are in awe.)


Once the onions and garlic are roasted, puree them in a blender and then add them to your pumpkin mixture! I added a couple cups of puree to the blender to make it easier to blend it all up. By covering the blender with a cloth, you can prevent the lid of the blender from popping off like a rocket and splattering hot goo all over you and your kitchen! I'm a fast learner; as in, I've only done that ONCE!
Last but NOT LEAST, add a few dashes of hot sauce to the whole pot. Our "go-to" is Tapatio.

I thawed out the pumpkin purée I did earlier this fall and put it in my stockpot.
I heated up the puree with the chicken stock that the base recipe calls for. I searched online and decided I liked the 1 lb roasted pumpkin = 1 cup puree so that's what I did. (I doubled this recipe.)
While the onions and garlic roasted in the oven, I added 2 teaspoons of tumeric and a overflowing tablespoon of honey to the pumpkin mixture.
Once the onions and garlic are roasted, puree them in a blender and then add them to your pumpkin mixture! I added a couple cups of puree to the blender to make it easier to blend it all up. By covering the blender with a cloth, you can prevent the lid of the blender from popping off like a rocket and splattering hot goo all over you and your kitchen! I'm a fast learner; as in, I've only done that ONCE!
Last but NOT LEAST, add a few dashes of hot sauce to the whole pot. Our "go-to" is Tapatio.
Enjoy!
This is very affordable pot of soup:
Pumpkin Puree figures out to: 6 cups puree at .04/ounce = $1.92
Onions = free from the side of the road
Garlic = not sure have it on hand
Tapatio = the whole bottle cost .51 so hardly anything at all
Tumeric = not sure because I have it on hand.
I love that everything I used in this soup I have and in 30 minutes total, I have a delicious pot of soup that is not only good for our bodies but for our budget; as well.
This is very affordable pot of soup:
Pumpkin Puree figures out to: 6 cups puree at .04/ounce = $1.92
Onions = free from the side of the road
Garlic = not sure have it on hand
Tapatio = the whole bottle cost .51 so hardly anything at all
Tumeric = not sure because I have it on hand.
I love that everything I used in this soup I have and in 30 minutes total, I have a delicious pot of soup that is not only good for our bodies but for our budget; as well.
Monday, October 21, 2013
Organic Pumpkin Puree
Our wonderful local market has organic pumpkins for sale right now at a great price! .29/lb to be exact. I bought two basketball sized pumpkins and brought them home to make some puree.
After I baked them until they were fork tender (removing the seeds and cleaning off the stringy stuff, cut in two), I used a spoon to remove the skin and used the food processor to puree it up.

From these two pumpkins, I got 14 cups of puree. I put 2 cups in each baggy and here is my price breakdown:
16 oz baggy versus 15 oz of organic canned pumpkin.
$5 got me both pumpkins!
With 14 cups I figure that out to be 112 ounces of puree. Divide $5/112 and I come up with .04 per ounce. Each baggy is worth .64! Compare that to store bought organic pumpkin puree (on sale right now) at $1.85 per can comes out to .12/ounce!
I'm no mathematician but I do believe I just tripled my money! WHOO HOO!
After I baked them until they were fork tender (removing the seeds and cleaning off the stringy stuff, cut in two), I used a spoon to remove the skin and used the food processor to puree it up.
From these two pumpkins, I got 14 cups of puree. I put 2 cups in each baggy and here is my price breakdown:
16 oz baggy versus 15 oz of organic canned pumpkin.
$5 got me both pumpkins!
With 14 cups I figure that out to be 112 ounces of puree. Divide $5/112 and I come up with .04 per ounce. Each baggy is worth .64! Compare that to store bought organic pumpkin puree (on sale right now) at $1.85 per can comes out to .12/ounce!
I'm no mathematician but I do believe I just tripled my money! WHOO HOO!
Friday, October 11, 2013
Making Tomato Juice


I found that if microwaved the fresh tomatoes for about 5 minutes I got more juice from them.
Hook up your Squeezo Strainer to the counter/table and get to work!

Year ago, (20?) we were brave and hooked the drill to the crank and we've never gone back! It rocks!


You just hold the trigger down a little if you want the juice in the pan and not all over everywhere...

One bowl of tomatoes gave me 4 qts of juice.

I have three 2 qt jars that I used this year. I dusted off my math skills and was able to figure out (all by myself!) that if you use 2T of lemon juice in 1 qt jar, I should use 2T in 2 qt jar. YAY for my rockin' math skills!

To prevent splatter mess, put a big ol' sheet or drop cloth down to just cover your "stuff." Also, the drill drips a bit so just throw a rag down. If you do this before you begin, you don't have near the mess to clean up. Lesson learned...

Push the tomatoes down the funnel while pressing the trigger:


I canned 21 qts and 1 pint of tomato juice. It will separate and not look pretty when you are done canning. That's okay! IT'S NORMAL! If you want it to be together, just give it a shake when right before you open it. If you're adding it to a soup or stew, it doesn't matter.
So, be brave and hook up the drill and never hand crank again!
Peach & Cilantro Salsa
I'm in love with this new canning cookbook my friend got for me!

It puts all of these great tasting canning recipes in one place... I thumb through the pages, mouth watering, dreaming of the next canning day.
My dream has become my reality as I have spent the last several days canning in my kitchen.
The Salsa Verde is the best I've ever had!
Today, I am giving the peach and cilantro salsa a whirl.

Here it is, simmering on the stove filling my home with define aroma.

You won't find the recipe posted here. I highly encourage you to purchase this cookbook. And just so you know, I am not getting any kickback for recommending this awesome book.
Save your pennies, and you may be able to be the highest bidder at some of the auctions I donate to coming up. Ha!


Wednesday, September 04, 2013
Steve's Salsa
I have tried salsa recipes for years. It seems like I never have good luck canning them. One of my friends shared this recipe and it gets rave reviews!


Steve's Salsa
24 Large tomatoes (Leave the skins on them and cut the tomatoes into at least quarters, if not smaller, for what size you want your "chunks" to be. I had little guys so I went by 24 cups, thinking one large tomato diced equals about a cup.)
6-12 Jalapeno peppers (Six for mild and remove the seeds, I used six and left the seeds in going for a "medium", use 12 for hot.)
6 Medium onions (I used two Gargantuan ones!)
3 large green peppers (I used two large ones because green peppers aren't my favorite.)
3 cloves garlic (I used 4 because while I don't love green peppers, I do love garlic.)
1 cup Vinegar
1/3 cup sugar
3 Tablespoons salt
3 Tablespoons oregano
3 Tablespoons cumin
Once the tomatoes were diced, I got out the food processor and let it do the chopping for me. In went the jalapenos, onions, peppers & garlic. Of course, this was done in batches...
To the chopped ingredients, I added the vinegar, sugar, salt, oregano & cumin. I stirred that up very well then I added all of the diced tomatoes; after I drained 1 1/2 cups of juice off them. (I let them sit for a while as I visited with a friend and when I came back there was quite a bit of liquid. This is how much easily poured off.)
Liquid drained off:
Stir it all up!
From there I filled the pint jars, put the lids on them as one does when canning, set them in the water-bath filled with cold water. (Just enough water so it covers the tops of all the jars.).
I turned the burner on, brought it to a hard boil, set the timer for 20 minutes, and that batch is complete!
This made 13 pints of salsa.
Cost analysis:
Tomatoes - from my garden, priceless, but for the sake of a figure, we'll say FREE
Jalapenos - again, from my garden
ORGANIC Green Peppers, 3/$1 so, .66 (clearance at local market!)
garlic - .59
The vinegar, sugar*, salt, cumin* & oregano* are things I just have on hand.
Cost of lids: $1.86/box
Total out-of-pocket expense: $3.11 for 13 pints of salsa. That's 23 cents per pint of NON GMO, home-grown, as good as it gets salsa!!!
*organic ingredients
Cost analysis:
Tomatoes - from my garden, priceless, but for the sake of a figure, we'll say FREE
Jalapenos - again, from my garden
ORGANIC Green Peppers, 3/$1 so, .66 (clearance at local market!)
garlic - .59
The vinegar, sugar*, salt, cumin* & oregano* are things I just have on hand.
Cost of lids: $1.86/box
Total out-of-pocket expense: $3.11 for 13 pints of salsa. That's 23 cents per pint of NON GMO, home-grown, as good as it gets salsa!!!
*organic ingredients
Tuesday, September 03, 2013
Salsa Verde - Thanks Pinterest!
I was gifted Canning for a New Generation and have drooled over what to make out of it. I was wasting time on Pinterest the other day and came across a salsa verde recipe that looked delicious. Kept reading and saw that Ladyface Blog had gotten her yummy recipe from none other than the cookbook I have on my own shelf!
Just in time, I got 10 pounds of organic tomatillos ordered for $14.00. I had my onions and garlic on hand; as well as our jalapenos and serano peppers in the garden. I had organic lime juice on hand but checked and it's $4.25 for 16 oz and I used a good 12 ounces of it.
Looks like I have around $20 of cash invested in this recipe plus on hand stuff. I know there is a dollar amount to that but I don't feel like figuring out how much my three onions cost. To figure my labor on the garden produce - well, that's priceless so we better stick with cash.
I tripled the recipe and should have gotten 12 pints. I got 10 1/2. I only canned 10 pints because we're going to eat this heavenly goodness tonight; all half-pint of it!

I'm no math geek but I do believe that comes out to $2 a pint. Other organic salsa sells for $4 - $4.25 for 16 oz. Again, I'm no genius but I do believe I just cut the price in half! Plus, I know exactly what went in our salsa! I'm so excited!!! The flavor is unbelievable and I can't wait to eat more tonight - that isn't off the spoon.
Just another post that pinterest is always wasted if it eventually leads to action. I just need to remind my husband of this everytime we open a jar!

Just in time, I got 10 pounds of organic tomatillos ordered for $14.00. I had my onions and garlic on hand; as well as our jalapenos and serano peppers in the garden. I had organic lime juice on hand but checked and it's $4.25 for 16 oz and I used a good 12 ounces of it.
Looks like I have around $20 of cash invested in this recipe plus on hand stuff. I know there is a dollar amount to that but I don't feel like figuring out how much my three onions cost. To figure my labor on the garden produce - well, that's priceless so we better stick with cash.
I tripled the recipe and should have gotten 12 pints. I got 10 1/2. I only canned 10 pints because we're going to eat this heavenly goodness tonight; all half-pint of it!
I'm no math geek but I do believe that comes out to $2 a pint. Other organic salsa sells for $4 - $4.25 for 16 oz. Again, I'm no genius but I do believe I just cut the price in half! Plus, I know exactly what went in our salsa! I'm so excited!!! The flavor is unbelievable and I can't wait to eat more tonight - that isn't off the spoon.
Just another post that pinterest is always wasted if it eventually leads to action. I just need to remind my husband of this everytime we open a jar!
Thursday, October 04, 2012
Caldo de pollo
We're seeing how much money we can save this month on our food/grocery bill so soups are on the menu! Last week, I made Locro de papas, a recipe from Ecuador and we ate it Wed, Thu & Sat nights. Friday my parents had us over for delicious ham & beans. This week we are having a simple caldo. Caldo, in my experience, can be made with whichever meat you want so the title would be "caldo de pollo" if using chicken, "caldo de rez" if using beef. One major difference in this soup is whole pieces of chicken are used; i.e. "bone-in." Here is what I used and my costs:
In my 24 QUART stock pot (yes, it is HUGE) I added:
~ 5 lbs of "whole" chicken quarters (the thigh and leg are still connected). Cost: $2.50
~ 5 lbs potatoes quartered (organic) Cost: $2.50
~ 2 lbs carrots chopped large (organic) $1.25
1 bunch celery, chopped large (organic) Cost: $.25
2 whole onions, chopped Cost: Free from gleaning onion field near-by.
2 orange tomatoes, chopped large Cost: Free garden produce, donated plants so time only
Filled pot with water
Added dash of salt, some black pepper and 3 cloves garlic
Total cost: $6.50
Fed ~ 35-40 people; which makes the cost per person: 35 people = $.19/person and 40 people = .16/person.

An option for those who don't want to eat it every day for a week would be to freeze it for future meals "on-the-go." We are eating it often for specific purposes I will share with you later.
In my 24 QUART stock pot (yes, it is HUGE) I added:
~ 5 lbs of "whole" chicken quarters (the thigh and leg are still connected). Cost: $2.50
~ 5 lbs potatoes quartered (organic) Cost: $2.50
~ 2 lbs carrots chopped large (organic) $1.25
1 bunch celery, chopped large (organic) Cost: $.25
2 whole onions, chopped Cost: Free from gleaning onion field near-by.
2 orange tomatoes, chopped large Cost: Free garden produce, donated plants so time only
Filled pot with water
Added dash of salt, some black pepper and 3 cloves garlic
Total cost: $6.50
Fed ~ 35-40 people; which makes the cost per person: 35 people = $.19/person and 40 people = .16/person.

An option for those who don't want to eat it every day for a week would be to freeze it for future meals "on-the-go." We are eating it often for specific purposes I will share with you later.
Thursday, September 06, 2012
Balcony: Dream to Reality
My dear hubby (DH) has started a very bad thing. When I am gone for 7-10 days the last of every July, he does some awesome project for me as a surprise! Last year, it was an above ground pool that has served us well for two summers now. This year, he was much more ambitious!
Five years ago, it was this:

Then the above balcony flooring went kaput and it was "off-limits" for a few years while we worked on our shop. We added a garage door to the room on the left, closed off the other door with a window, stucco, stone and did a nice re-haul externally, not to mention pouring concrete in the bays and adding doors to the bays.

We also put on a gorgeous copper penny standing seam roof!


The economy crashed and we held on by our boot straps for three years and are finally able to start looking ahead again! Praise the Lord!
I digress. Let me show you in pictures:
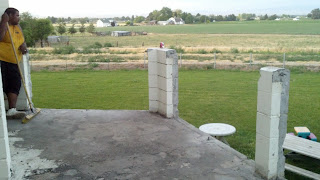


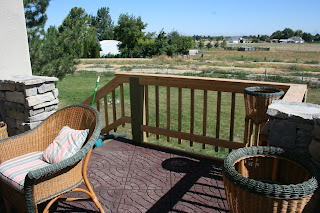


Besides the pavers being a recycled system, we re-used or made "new-to-us" everything you see except wood for railings and stairs, mesh for stucco system, new plant in corner. We mixed up left over stucco color from different jobs to get the color we got and went for it! It's awesome. In fact, we have enough left to stucco the entire East side of the house! Everything else already had a home and we are thrilled to give it a new home here on our balcony. I can't wait to use the chiminea that we have had since 2004(ish). It's been waiting for too many years (five). You, too, can have exterior work done by us...
Next up - trim, electrical outlets and staining wood! Until then, you can find me here:

Five years ago, it was this:

Then the above balcony flooring went kaput and it was "off-limits" for a few years while we worked on our shop. We added a garage door to the room on the left, closed off the other door with a window, stucco, stone and did a nice re-haul externally, not to mention pouring concrete in the bays and adding doors to the bays.

We also put on a gorgeous copper penny standing seam roof!

It looks so nice!

The economy crashed and we held on by our boot straps for three years and are finally able to start looking ahead again! Praise the Lord!
I digress. Let me show you in pictures:
knocking out old blocks:

close-up of old blocks (most were missing sections of the star.)

ready for stucco and rocks!

lots of prep work while I was away:

membrane down:

floor ready for paving system!

Cinder Blocks to Stucco!

Wooden railing and stone columns!

After membrane was applied to flooring so it wouldn't leak through to bottom patio,
"we" applied these awesome pavers! A recycled rubber paver system, each one keeps 4 tires out of our landfills. Looks great, comfortable to walk on and maintenance free!
"we" applied these awesome pavers! A recycled rubber paver system, each one keeps 4 tires out of our landfills. Looks great, comfortable to walk on and maintenance free!

Here's where you can SEE the difference!
There weren't any stairs before so that is VERY nice.
There weren't any stairs before so that is VERY nice.
"We" did the balcony and patio below in stucco and stone.

SE corner looking to the NW:

E looking NE:

SE looking NE:

NE looking SE:
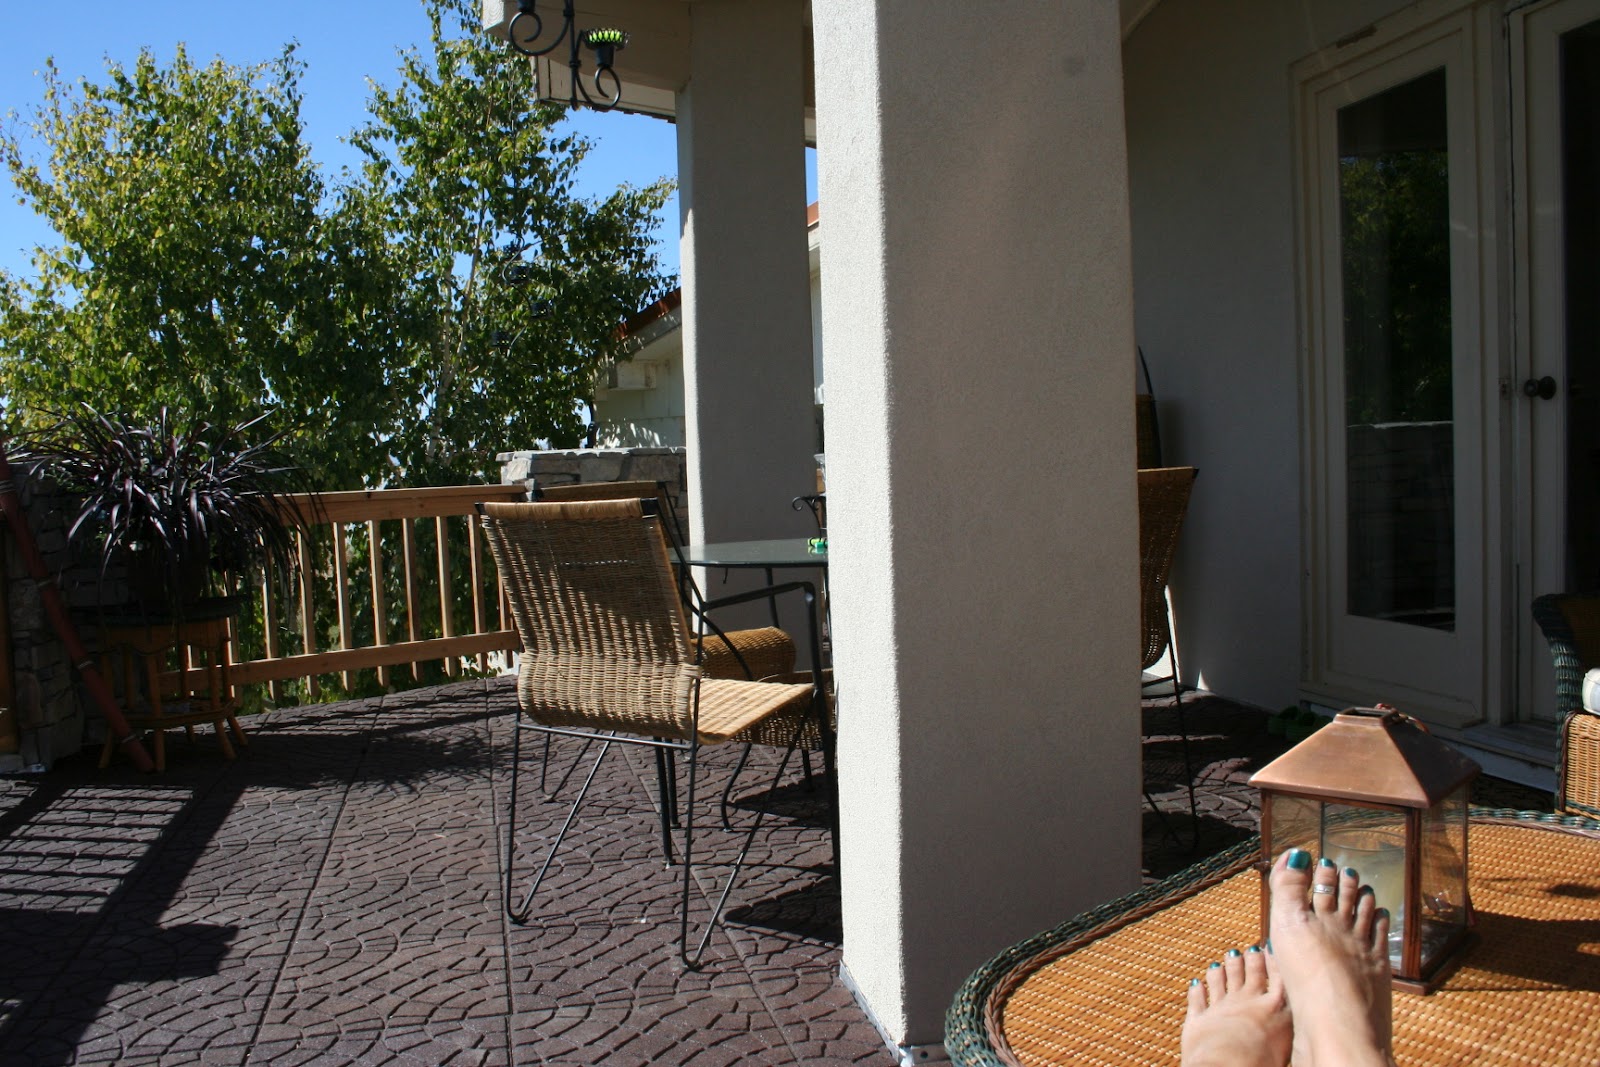
E looking SW:

NW looking SE:

N looking S:

The Lounge Area:

The Landing (didn't exist before):

Stairs (didn't exist before):

Dining Area:

Looking out my door:

Besides the pavers being a recycled system, we re-used or made "new-to-us" everything you see except wood for railings and stairs, mesh for stucco system, new plant in corner. We mixed up left over stucco color from different jobs to get the color we got and went for it! It's awesome. In fact, we have enough left to stucco the entire East side of the house! Everything else already had a home and we are thrilled to give it a new home here on our balcony. I can't wait to use the chiminea that we have had since 2004(ish). It's been waiting for too many years (five). You, too, can have exterior work done by us...
Next up - trim, electrical outlets and staining wood! Until then, you can find me here:

Subscribe to:
Posts (Atom)